This is part-3 from the five-part series tutorial of the blog post, Computing Molecular Descriptors – Intro, in the context of drug discovery. The goal of this post to explain the python code on computing Morgan ECFP fingerprints also known as ECFP6 (radius = 3) connectivity fingerprints.
What Are ECFP Fingerprints?
Please read this article and this blog post to learn about extended connectivity fingerprints. There are more blog posts out there such as Depth-First, and Medium that explains the algorithm of ECFP6 so I won’t cover it here.
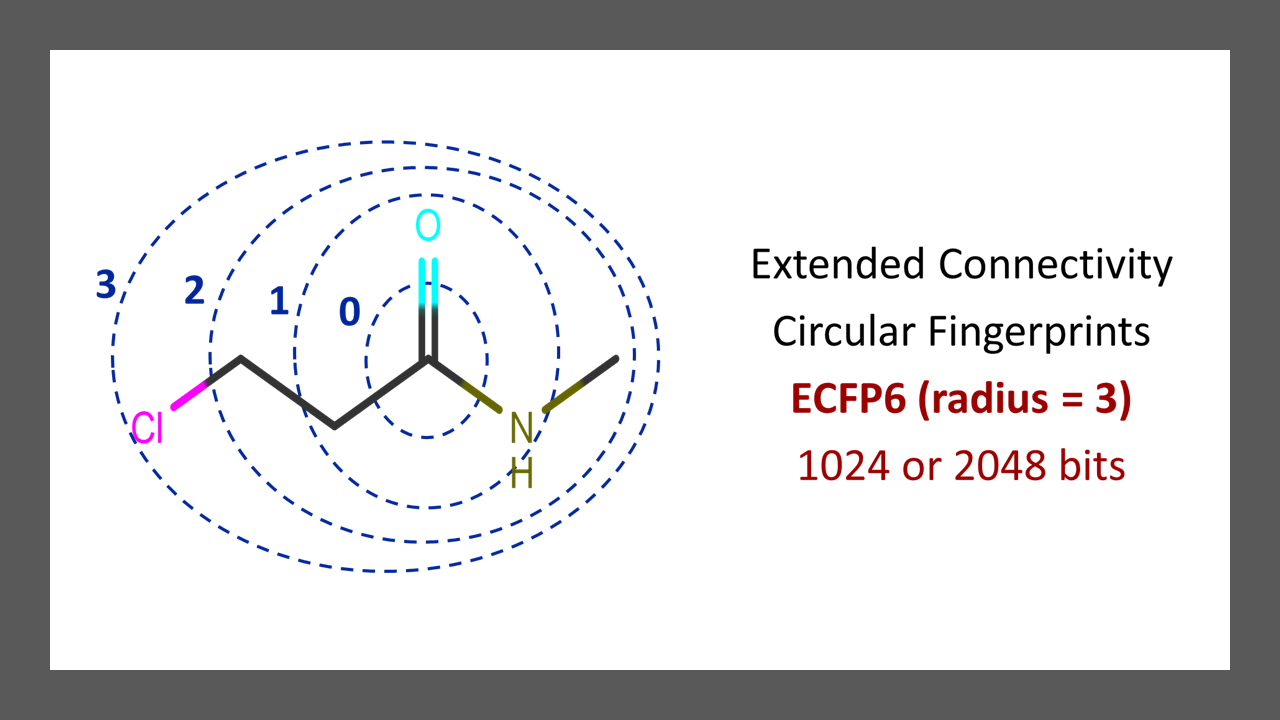
To put it simply, in ECFP, you iterate for each atom of the molecule and retrieve all possible molecular routes from that atom based on a specified radius. Please see Figure 1 below for a graphical illustration of radii or bond depths based on the carbon atom from the carbonyl functional group. Radius 2 (ECFP4) and radius 3 (ECFP6) are commonly used. For a smaller radius, you will extract smaller fragments, and for a larger radius, you will extract larger fragments.
Essentially, it will extract information on substructures containing circular atom neighborhoods such as an atom and its connectivity to immediate neighbors and then neighbors of those neighbors.
Note that each bit position in ECFP indicates the presence or absence of particular substructures as in MACCS and other molecular fingerprints. ECFP fingerprints are not predefined thus they are also known as implicit fingerprints.

Implementing Python Code
First, install the required library packages using miniconda.
conda install -c rdkit rdkit
conda install pandas
conda install numpy
The code for ECFP6 class that I have developed can be found below and here in the GitHub link as well.
Also, please check out the previous posts: Computing Molecular Descriptors – Part 1 and MACCS Fingerprints in Python – Part 2 to see more explanation on the formatting of the code and python class. I won’t be going over them as much since they are already covered in those two posts.
import numpy as np
import pandas as pd
from rdkit.Chem import AllChem
from rdkit import Chem, DataStructs
class ECFP6:
def __init__(self, smiles):
self.mols = [Chem.MolFromSmiles(i) for i in smiles]
self.smiles = smiles
def mol2fp(self, mol, radius = 3):
fp = AllChem.GetMorganFingerprintAsBitVect(mol, radius = radius)
array = np.zeros((1,))
DataStructs.ConvertToNumpyArray(fp, array)
return array
def compute_ECFP6(self, name):
bit_headers = ['bit' + str(i) for i in range(2048)]
arr = np.empty((0,2048), int).astype(int)
for i in self.mols:
fp = self.mol2fp(i)
arr = np.vstack((arr, fp))
df_ecfp6 = pd.DataFrame(np.asarray(arr).astype(int),columns=bit_headers)
df_ecfp6.insert(loc=0, column='smiles', value=self.smiles)
df_ecfp6.to_csv(name[:-4]+'_ECFP6.csv', index=False)The above code snipped is a class stored as “ECFP6.py”. You can load it in other python scripts and call its modules conveniently. For example, let’s say you have a file containing smiles and you want to compute ECFP6 for them. Below is the code to do that. It follows pretty much the same code format as MACCS from the previous blog tutorial.
import pandas as pd
from molvs import standardize_smiles
from ECFP6 import *

def main():
    filename = 'data/macrolides_smiles.csv'  # path to your csv file
    df = pd.read_csv(filename)               # read the csv file as pandas data frame
    smiles = [standardize_smiles(i) for i in df['smiles'].values]

    ## Compute ECFP6 Fingerprints and export a csv file.
    ecfp6_descriptor = ECFP6(smiles)        # create your ECFP6 object and provide smiles
    ecfp6_descriptor.compute_ECFP6(filename) # compute ECFP6 and provide the name of your desired output file. you can use the same name as the input file because the ECFP6 class will ensure to add "_ECFP6.csv" as part of the output file.

if __name__ == '__main__':
    main()
Okay, Now Let’s Break Down the Python Code on ECFP6 Class!
Explaining the Python Code for ECFP6 Class
In this tutorial, I am gonna explain the code function by function.
class ECFP6:
    def __init__(self, smiles):
        self.mols = [Chem.MolFromSmiles(i) for i in smiles]
        self.smiles = smiles
In the __init__() method, we provide smiles which are stored as a class attribute as self.smiles and then converted into mols in the variable self.mols.
    def mol2fp(self, mol, radius = 3):
        fp = AllChem.GetMorganFingerprintAsBitVect(mol, radius = radius)
        array = np.zeros((1,))
        DataStructs.ConvertToNumpyArray(fp, array)
        return array
In the class method mol2fp(), we provide two parameters known as mol and radius. The second parameter is optional, and the default is set to a radius of 3. By using this radius parameter, we compute ECFP6 (the equivalent of radius 3), ECFP4 (the equivalent of radius 2), and ECFP2 (the equivalent of radius 1). Depending on smaller or larger fragments, you can easily adjust the radius when you call that function (more preferred) or change the default value; whichever you prefer.
The method mol2fp() takes in a single mol, computes ECFP6 fingerprints (the default radius is currently set to 3), converts the fingerprint vector into a NumPy array, and returns it. So, you provide a mol to that function and it will return ECFP fingerprints in the form of NumPy array.
    def compute_ECFP6(self, name):
        bit_headers = ['bit' + str(i) for i in range(2048)]
        arr = np.empty((0,2048), int).astype(int)
        for i in self.mols:
            fp = self.mol2fp(i)
            arr = np.vstack((arr, fp))
        df_ecfp6 = pd.DataFrame(np.asarray(arr).astype(int),columns=bit_headers)
        df_ecfp6.insert(loc=0, column='smiles', value=self.smiles)
        df_ecfp6.to_csv(name[:-4]+'_ECFP6.csv', index=False)
The class function “compute_ECFP6()” calls the previous function “mol2fp()” to compute ECFP6 for all the mols (self.mols) which are stored and appended to the list arr. It then converts the NumPy arrays of the computed ECFP6 fingerprints into a pandas dataframe with the headers “bit0, bit1, …” and exports a CSV file. Below is an example output CSV file.

That’s all for this post for now. Please stay tuned for the next post: RDKit_2D Descriptors in Python – Part 4.
